
Do you have a light fixture you rarely or never use, but need more outlets? It’s a lot easier to get more outlets via a light bulb socket than you might think!
I want to help you get it done. In this article, you’ll learn the basics of how to convert a light bulb socket to an outlet. I’ll cover the following ways:
- Option #1: Using a socket to outlet adapter
- Option #2: Swapping out a light socket to an outlet
Contents
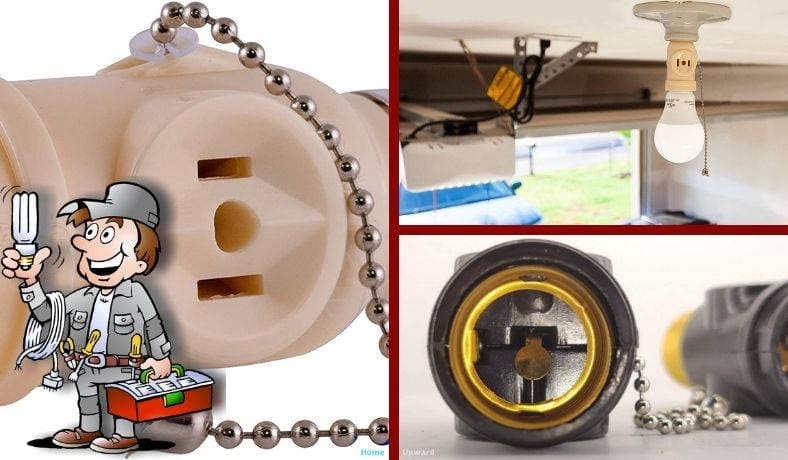
Option #1: Using a light bulb socket to outlet adapter
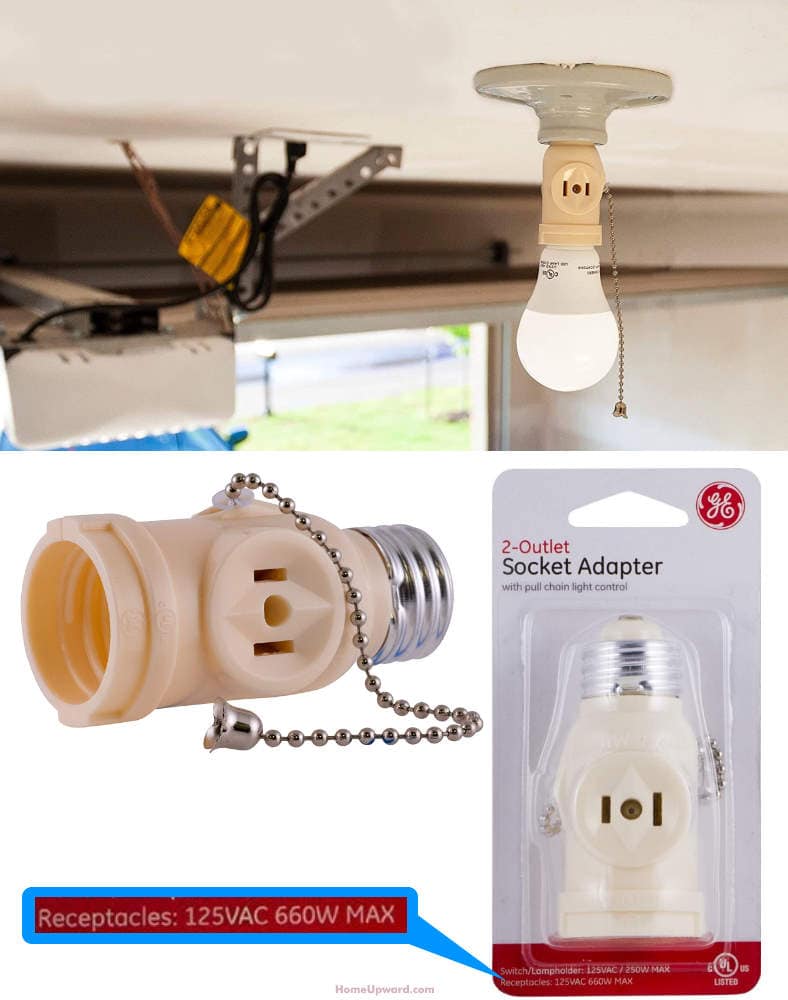
The single easiest way to convert a light bulb socket to an outlet is by using an adapter. However, there are definitely pros and cons versus replacing the bulb socket with a real outlet.
For example, as you can see in the image above, a light bulb socket adapter isn’t rated for higher power levels like a standard (hardwired) outlet is. They’re only rated at about ~660W while most home outlets can provide 1,500W to 1,800W of power.
While that’s not a problem for light-duty appliances, electronics, and so on, you won’t be able to use high power devices like:
- Electric heaters
- Air conditioners
- Higher-power dehumidifiers
- Power tools that use high power draw
If you’re wanting to use 660W or more power with a light bulb socket, you’ll want to replace the light bulb socket with alternating current (AC) outlets as I’ll show you later.
How to use a light bulb socket adapter
Bulb socket adapters are super easy to use:
- Remove the light bulb
- Screw the adapter in place of the bulb
- Insert & screw the bulb into the bulb socket of the adapter
Some also include an on/off pull chain, although that’s completely optional since you can still use the same light switch already installed (just leave the adapter’s on/off switch in the on position).
The good news is that not only is an adapter a snap to install, but they’re also very inexpensive, too: most are only a few dollars.
Option #2: Changing out a bulb socket for an electrical outlet
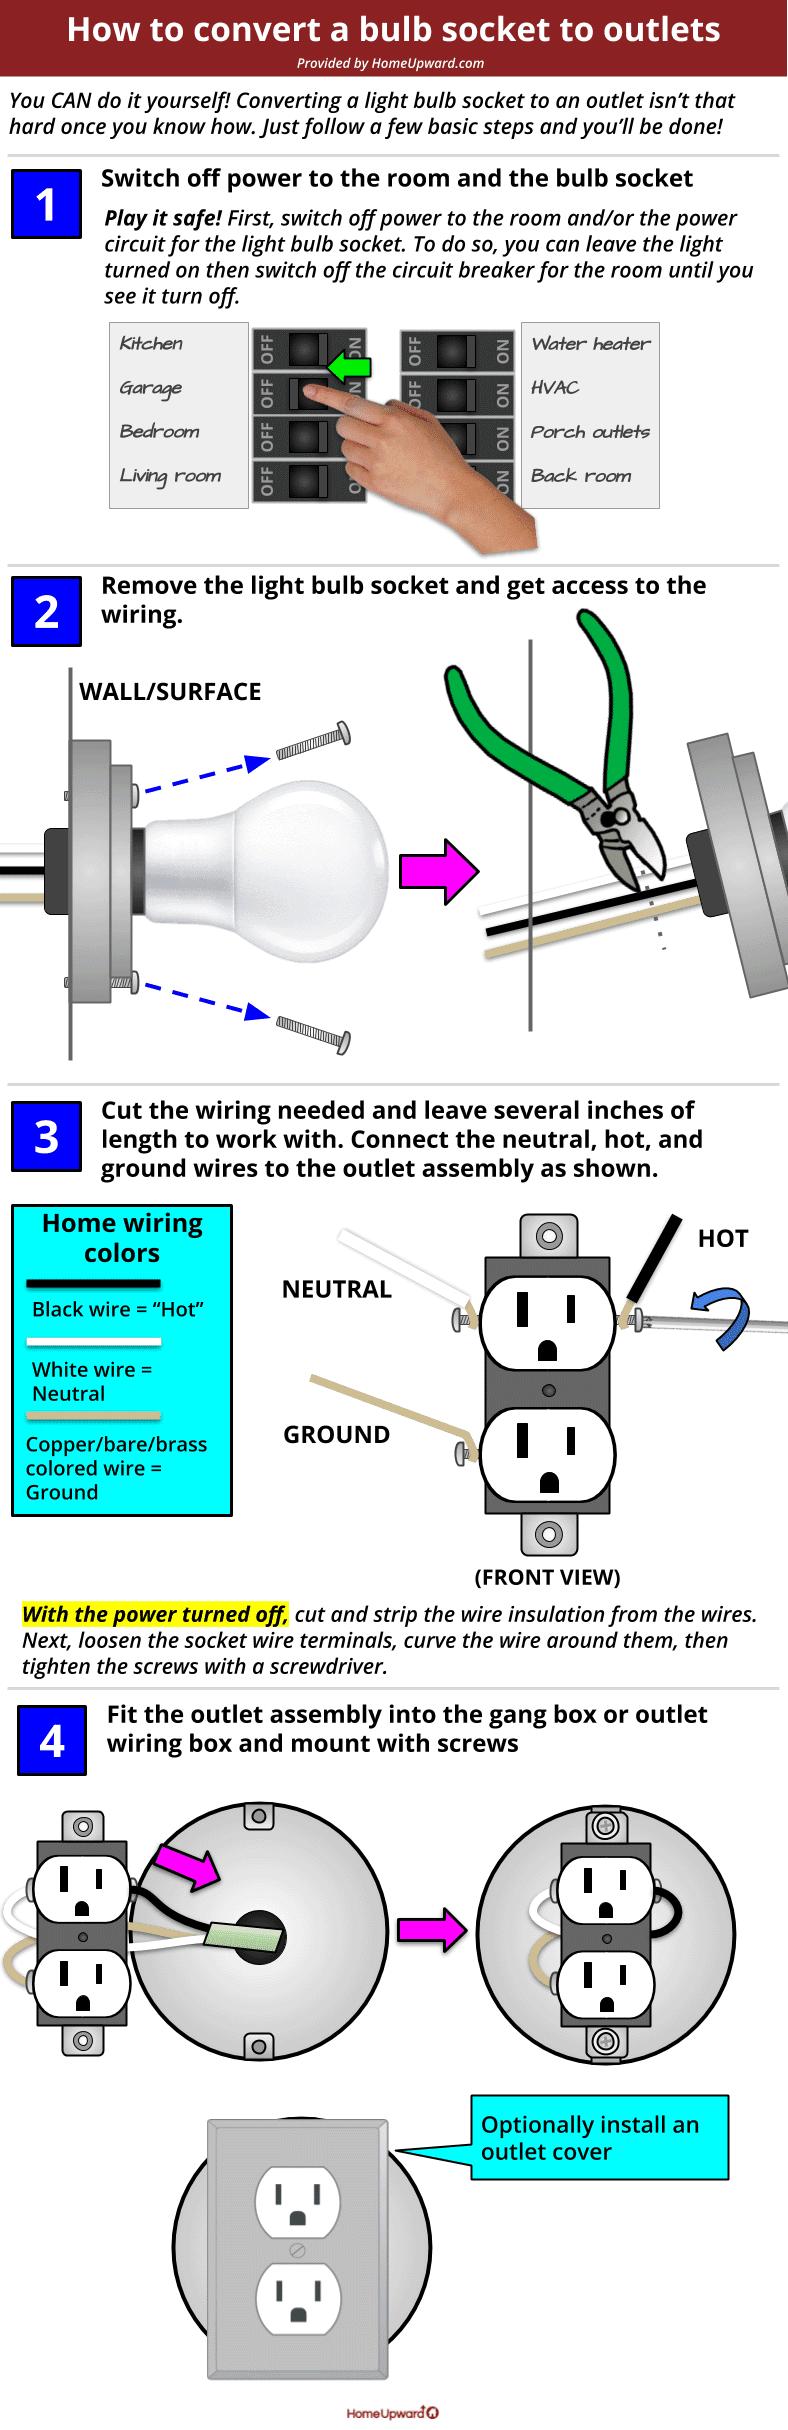
Getting started: Turn off the power
To begin, make sure you turn off the power to the room you will be working in.
Just turning off the light switch will not cut it – you may end up electrocuting yourself. Be safe, and turn the power off to the room from your home’s circuit breaker box.
Not sure where your breaker box is? Most boxes (also known as circuit panels) are usually in a room used more for “utility” than day-to-day living. Most are inside a metal box or mounted flush with the wall but have a metal cover with a pull tab that swings open.
Circuit breaker boxes mounted on the wall are often gray while those mounted in the wall (flush-mounted) often get painted over.
These can often be found on the wall in your:
- Basement
- Laundry room
- Garage
- Hallway closet
- Utility closet
- Inside a large wall cabinet
- In the hallway between the main house and bedrooms
- Outside where power is entering your home
- Near your water heater or HVAC unit
In some cases, your home may have two or more circuit panels, known as subpanels. If your subpanel is neatly labeled and has the entire room you will be working in labeled, then you can cut the power at the subpanel.
If you are even slightly unsure, cut the power at the main circuit box.
To turn the power to a room off, find the switch or knob that is labeled for your room and turn it to the OFF position.
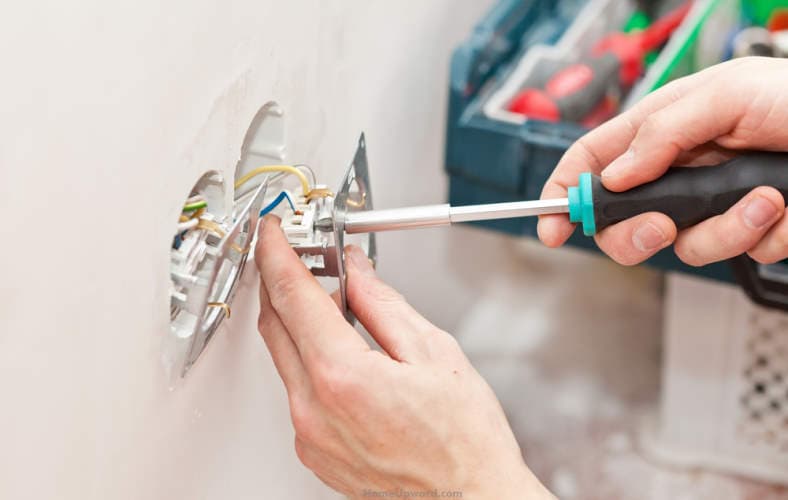
Changing a light socket to an outlet or plug
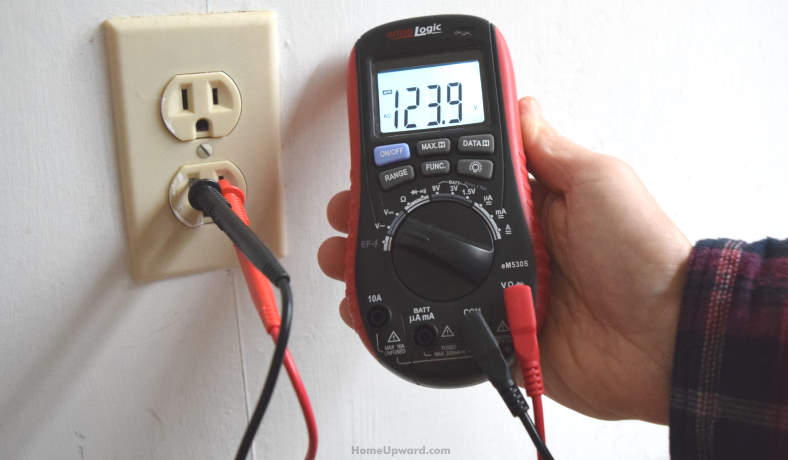
- Test your overhead light and an outlet on the same wall as your socket. Make sure no power is flowing by ensuring an overhead light does not turn on or an outlet does not provide power. You can find very affordable voltage test meters in home improvement stores or the tool or electrical section in general merchandise stores like Wal-Mart. (You can get one that works well for under $10).
- Remove the fixture from the wall. There will be screws that anchor the light fixture in place. Put the fixture and screws to the side.
- A mounting plate will be attached to a box in the wall known as a gang box. Remove those screws, and place the screws and plate with the fixture.
- Cut the wires connected to the fixture as close to the fixture as possible. You’ll want 3-4 inches of wire coming out of the gang box. There will be three wires – usually copper – that have a colored insulation to help you identify them. Home wiring in the United States nearly always uses the same colors: black, white, and copper-colored.
- Grab your new outlet. It will have wiring connection terminals on both sides (sometimes labeled) or will have small holes to insert the wire into. Loosen the screws enough that you can bend wire around the screws if it’s a screw type or enough to insert wire if it’s the hole type. Next:
- Take the white wire (“neutral”) and strip about ½ inch of the insulation off. It will slide off, revealing the wire conductor underneath.
- Do the same with the black wire.
- Wrap the uncovered wire conductors around the screw terminals (screw type outlet) to form a “U” shape or insert into the tension holes for hole type outlets.
- Tighten the screws until they hold the wire firmly. Don’t overtighten them.
- If there’s a third wire coming out of the box (in most cases, there is one) that’s the ground wire. Most outlets have a ground wire terminal connection also.
- Gently feed the wire back into the wall, and place the outlet into the gang box or outlet wiring box. Your outlet should have come with two screws at the top and bottom that will line up with holes in the gang box. Tighten those screws by ensuring they latch into the gang box.
- Grab your outlet cover. The internal opening should line up perfectly with your outlet or plug, which will have a spot for the cover screws. The cover will come with matching screws – secure the cover by tightening the screws. (TIP: Don’t overtighten the outlet cover screw – only use as much force as you need to make it fairly tight and so it won’t come loose)
- Head back to the circuit breaker and flip the power back on. Use an electrical tester to make sure everything is connected. You should be able to insert your test meter probes into the outlet’s jacks and measure about 110V AC if the outlet assembly is wired correctly.
Why convert a light socket to a plug or outlet?
Converting a light bulb socket you no longer use into an outlet or pair of outlets can be a great way to get more outlets without the need to spend a ton of money for a contractor or electrician. Swapping those lights out for outlets means can give you more outlet space to power devices that you actually want to use all over your home instead of further away at the next outlet available.
If you have light fixtures under eaves or up high, but would rather have a power source for holiday lights or decorations, converting that unused light into an outlet means you won’t need long extension cords anymore.
Here’s an even more personal, real-life use:
The ceiling of my garage had an electric door opener, a separate light that was connected to the opener, a small overhead light over the parking area, and a small overhead light illuminating the washer and dryer.
A surplus store was going out of business, so I stopped by to see what they had on sale. I found a large overhead light that was designed to look like a shop or garage fluorescent light, but actually used LEDs. This light has hooks to hang or mount it, and a plug to power it. And it cost me less than $10!
I removed the separate light that was over my car (it was too small and dim to really illuminate the garage anyway,) and turned it into an outlet. I was able to mount my new energy-saving, ultra-bright light, without having to run new wire to the ceiling!
Hardwiring an outlet vs. using an adapter
As I mentioned at the beginning, you can change a light socket to outlets easily by buying a plug adapter. These work by screwing in the adapter just like how you would screw in a light bulb.
There’s another big problem, however, besides their power handling limit (about 660W): Many of these adapters are not grounded, which means if you use this method, you will also need to use a non-grounded-to-grounded converter or power strip.
Some electronics can’t work correctly without a ground plug and some appliance or power tools require a ground connection to provide the correct safety functions or to allow the device to work (in some cases, if the ground is missing the device won’t work as it assumes there’s a safety problem).
Adapters are also limited in their power output. In some cases, they will have 660W max which will be fine to power small electronics, TVs, and appliances. However, many standard sockets have a 100W max, which will significantly limit what you can plug into the adapter.
It is safer to convert a light bulb socket to a plug – and you can get a LOT more power!
Tools you may need for your light socket to outlet conversion
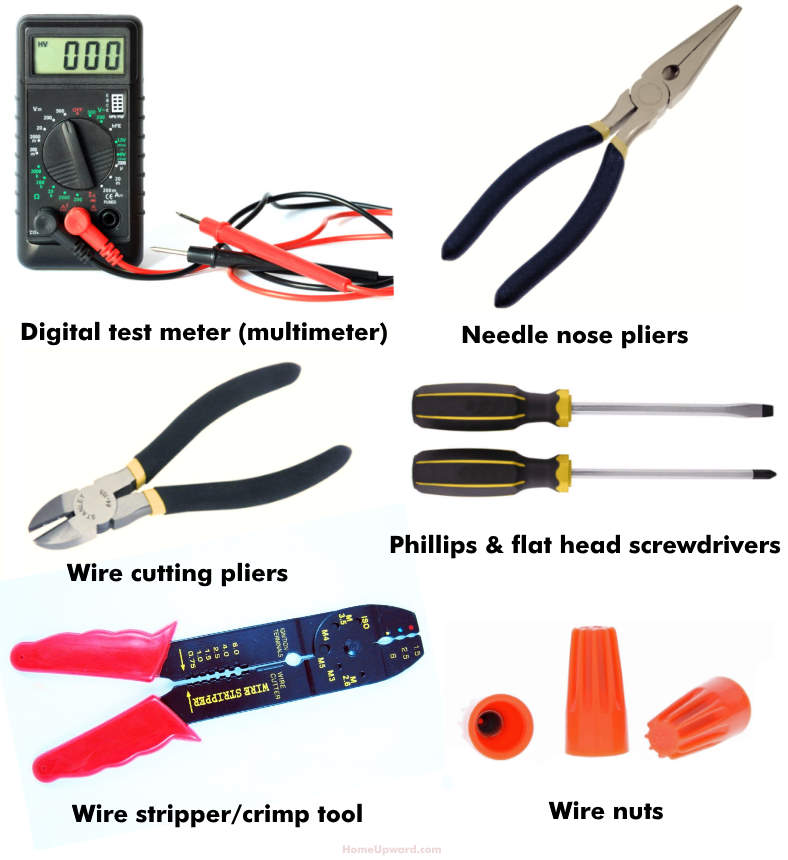
If you’re not sure you can do the job on your own, contact a professional electrician. However, it’s actually not very hard – but you’ll need some tools and supplies (although if you shop smart they’re not expensive).
Tools you may need to complete the conversion:
- OPTIONAL BUT RECOMMENDED: electrical test meter (digital multimeter)
- Philips and flathead screwdrivers (you will probably use one or the other)
- Wire cutters
- Pliers
- Wire strippers (you can often use pliers to do this and avoid having to buy these separately)
- Your preferred outlet or plug
- These come in a variety of colors and styles. Pick one that matches your existing plugs, or that more closely suits your outlet needs!
- A matching outlet cover
- Depending on the type of outlet or plug you pick, you’ll want to find a cover that matches. Some are made for rounded style outlets, specialty plugs, square outlets, and so on.